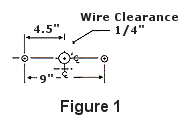
- Instruct Masonry contractor to leave a "weep rope" in the mortar joint immediately above the built in address stone or drill 1/4" diameter wire clearance hole through the mortar joint as shown in Figure No. 1 to accommodate the low voltage wire.
 Mark location for the 2 mounting holes on mortar joint for the installation of the illuminator frame. Drill and install screw anchors (supplied). Mark location for the 2 mounting holes on mortar joint for the installation of the illuminator frame. Drill and install screw anchors (supplied).
- The illuminator is furnished with four 14 volt lamps (NO. 1816) and requires 10 volt-amperes at 14 volts from a bell type transformer. If the illuminator is to be operated from the same transformer as a bell or chime installation, a transformer rating of 30 VA is recommended.
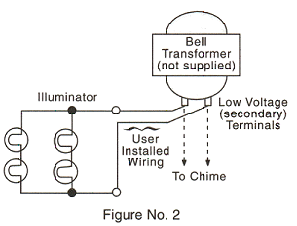 Run two (2) separate, NO. 18, or larger, bell wires into the 1/4" diameter clearance hole through the wall surface, connecting the far ends to the secondary terminals of the bell transformer as shown in Figure No. 2. Run two (2) separate, NO. 18, or larger, bell wires into the 1/4" diameter clearance hole through the wall surface, connecting the far ends to the secondary terminals of the bell transformer as shown in Figure No. 2.
ALTERNATIVE POWER SUPPLY
Use a 10VA (Class II) 14 Volt transformer available from the factory.
- Remove approximately 1/4" of installation from the exposed end of each wire. Insert each wire end into the barrel end of a lug terminal (supplied) and crimp securely with pliers.
- Connect one (1) wire to each terminal with machine screws (supplied).
- Secure illuminator frame to mounting surface with the two (2) mounting screws (supplied).
|